All weathervanes and finials come with assembly instructions. These copper weathervanes require minimal assembly, and always add a nice finishing touch to your cupola. The real copper will age and weather with environmental exposure, eventually reaching a beautiful antique patina. If you want to speed up the aging process, we have a special copper aging recipe listed at the bottom of the page. Once you have assembled and installed your weathervane it is recommended to finish with a bead of caulk or silicone around the mast where it meets the cupola roof to seat and seal the rod to the cupola roof.
HELPFUL VIDEOS:
Assembling a Standard Size Weathervane: https://www.youtube.com/watch?v=BaFxcnCzL2I
Using Retaining Clips: https://www.youtube.com/watch?v=Xd84O0JGX3w
FAQ: The Copper Finish: https://www.youtube.com/watch?v=0jDQ6LxIbrk
FAQ: How to Read a Weathervane: https://www.youtube.com/watch?v=a33oKM3foso
Adapting a Garden Weathervane to a Cupola: https://www.youtube.com/watch?v=8l_uKmXVj5Y
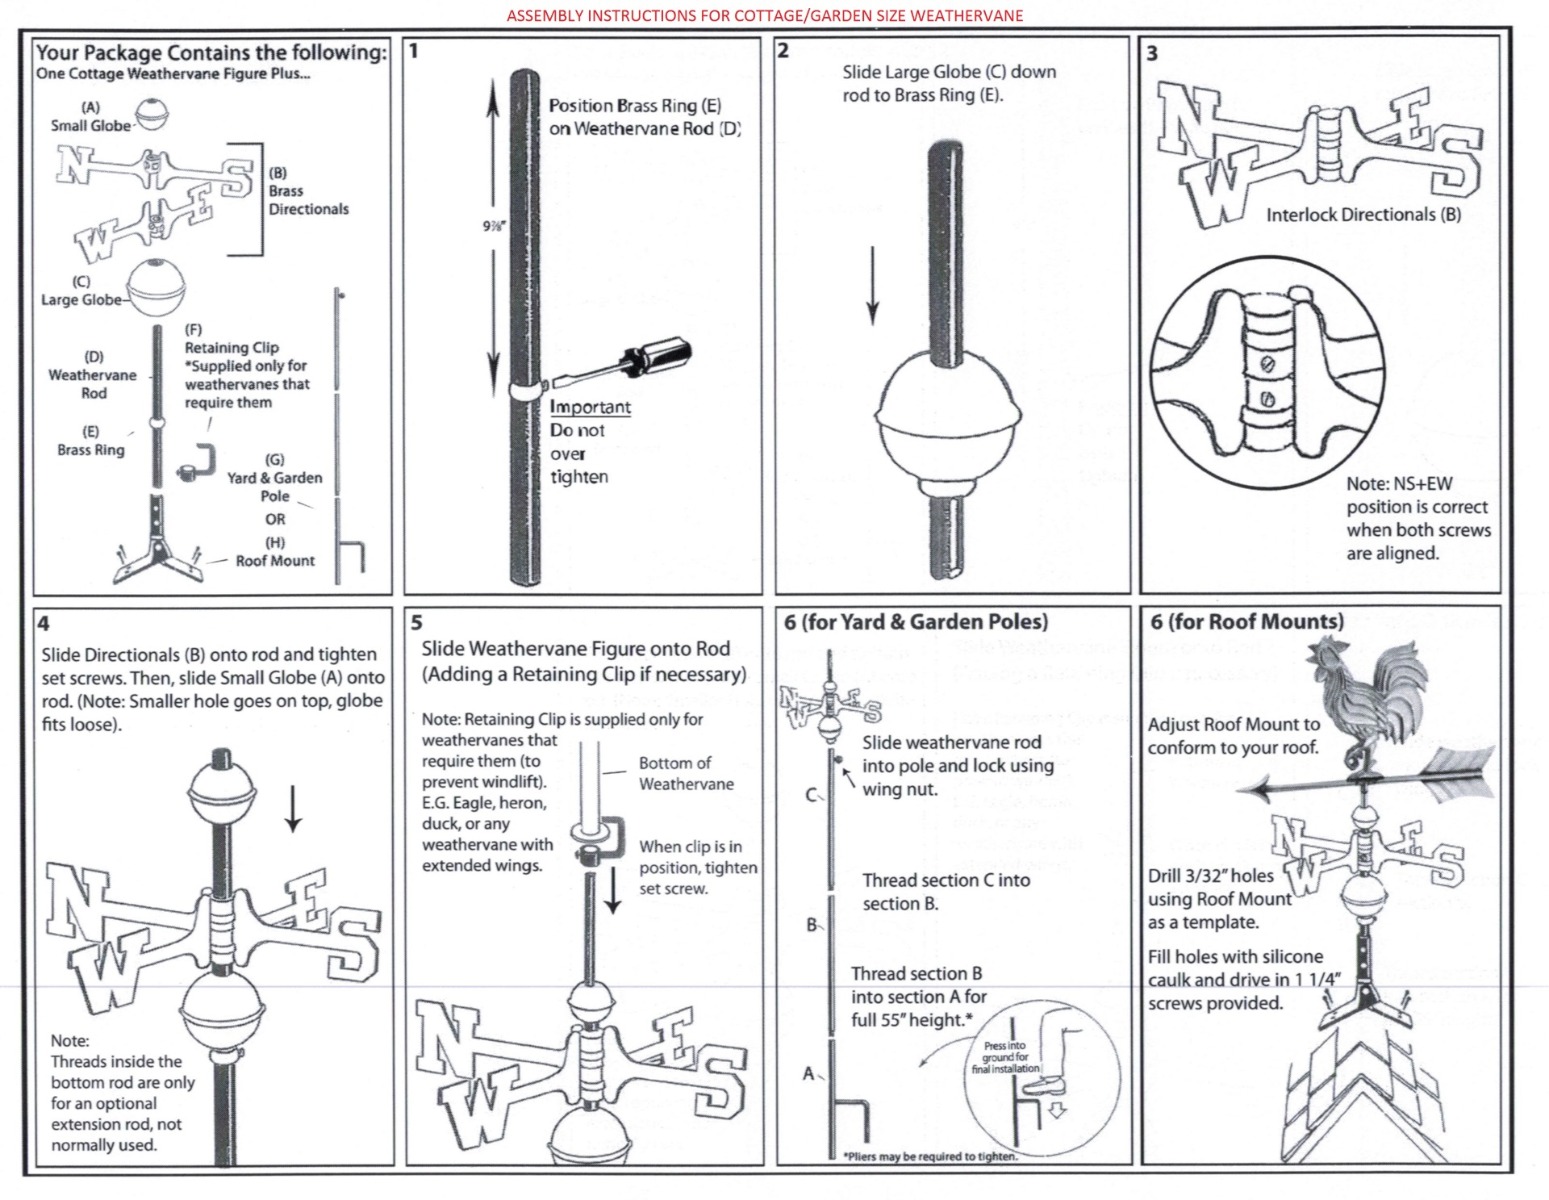
Assembly Instructions for Cottage/Garden Size Weathervane
Your Package Contains the following: One cottage weathervane figure plus...
- (A) Small Globe
- (B) Brass Directionals
- (C) Large Globe
- (D) 11" Small Rod
- (E) 18" Large Rod
- (F) Brass Ring (Can be discarded)
- 1. Thread small rod (D) into large rod (E) & position wrenches on flat spots. Tighten firmly.
- 2. Slide large globe (C) down small rod (D). Globe will rest on top of large rod (E).
- 3. Interlock directionals (B). Note: NS + EW position is correct when both screws are aligned.
- 4. Slide directionals (B) onto rod and tighten set screws. Then, slide small globe (A) onto rod. (Note: Smaller hole goes on top, globe fits loose). Note: Threads inside the bottom rod are only for an optional extension rod, not normally used.
- 5. Slide weathervane figure onto rod (adding a retaining clip if included). Note: Retaining clip is supplied only for weathervanes that require them (to prevent windlift). E.G. Eagle, heron, duck, or any weathervane with extended wings.
- 6. Slide weathervane rod into cupola roof, and lock into place with internal mounting bracket.
- 7. Good Directions cupolas are "Weathervane Ready" with internal mounting bracket installed, and a 3/4" hole in the roof. The weathervane rod is secured in roof section before the final assembly of the cupola.
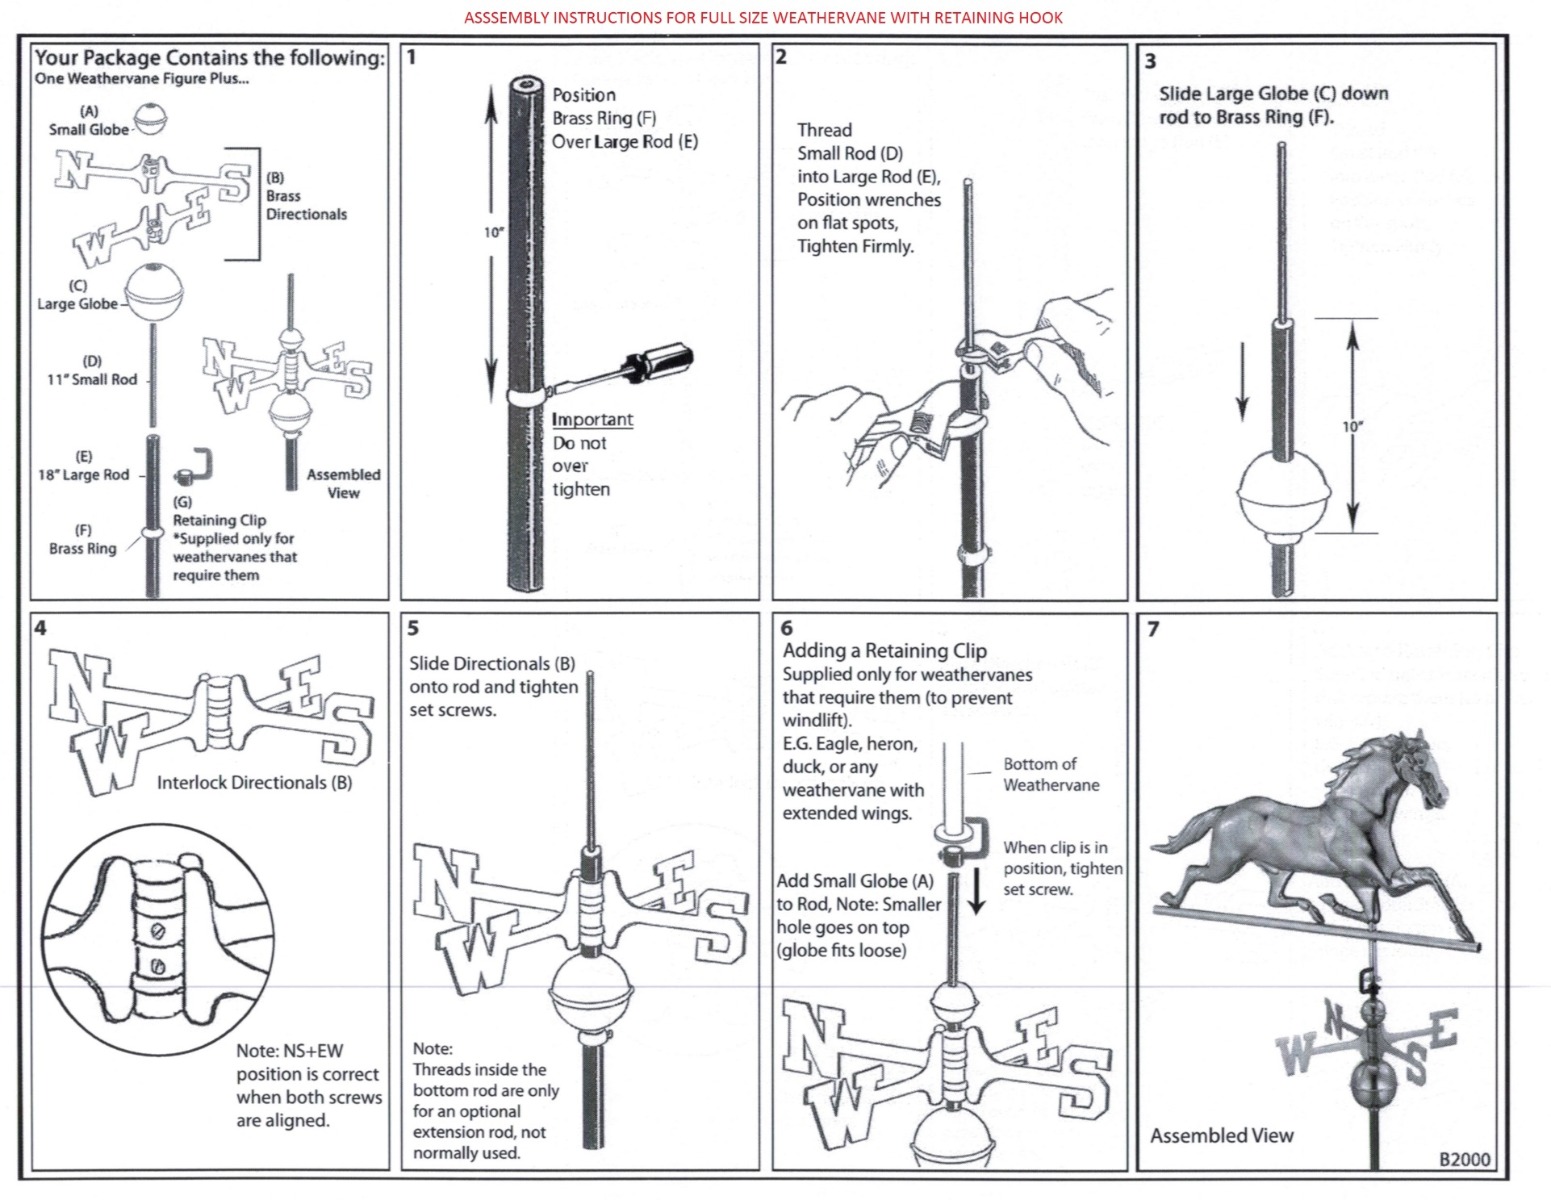
Assembly Instructions for Full Size Weathervane with Retaining Hook
Your Package Contains the following: One weathervane figure plus...
- (A) Small Globe
- (B) Brass Directionals
- (C) Large Globe
- (D) 11" Small Rod
- (E) 18" Large Rod
- (F) Brass Ring
- (G) Retaining Clip *Supplied only for weathervanes that require them
- 1. Position brass ring (F) over large rod (E). Important - Do not over tighten.
- 2. Thread small rod (D) into large rod (E) & position wrenches on flat spots. Tighten firmly.
- 3. Slide large globe (C) down rod (D) to brass ring (F).
- 4. Interlock directionals (B). Note: NS + EW position is correct when both screws are aligned.
- 5. Slide directionals (B) onto rod and tighten set screws. Note: Threads inside the bottom rod are only for an optional extension rod, not normally used.
- 6. Adding a retaining clip - Supplied only for weathervanes that require them (to prevent windlift). E.G. Eagle, heron, duck, or any weathervane with extended wings. Add small globe (A) to Rod. Note: Smaller hole goes on top (globe fits loose).
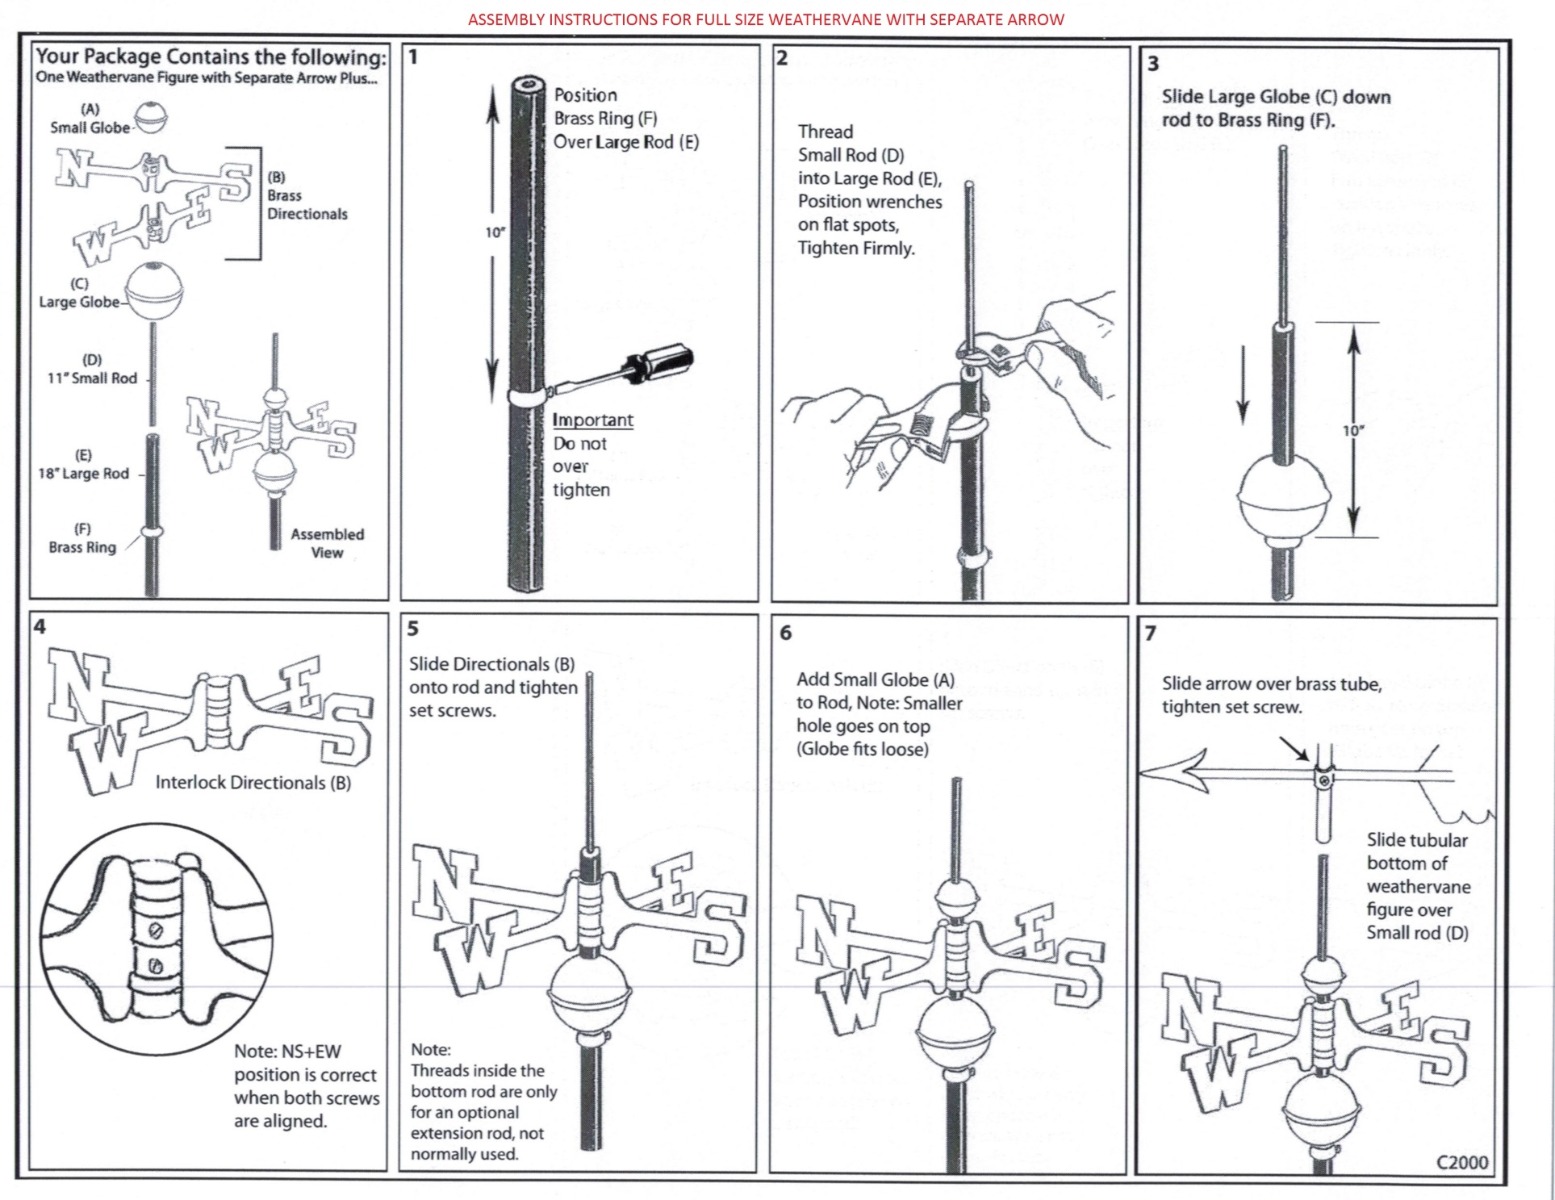
Assembly Instructions for Full Size Weathervane with Separate Arrow
Your Package Contains the following: One weathervane figure with separate arrow plus...
- (A) Small Globe
- (B) Brass Directionals
- (C) Large Globe
- (D) 11" Small Rod
- (E) 18" Large Rod
- (F) Brass Ring
- 1. Position brass ring (F) over large rod (E). Important - Do not over tighten.
- 2. Thread small rod (D) into large rod (E) & position wrenches on flat spots. Tighten firmly.
- 3. Slide large globe (C) down rod (D) to brass ring (F).
- 4. Interlock directionals (B). Note: NS + EW position is correct when both screws are aligned.
- 5. Slide directionals (B) onto rod and tighten set screws. Note: Threads inside the bottom rod are only for an optional extension rod, not normally used.
- 6. Add small globe (A) to rod. Note: Smaller hole goes to top (Globe fits loose).
- 7. Slide arrow over brass tube, tighten set screw. Slide tubular bottom of weathervane figure over small rod (D).
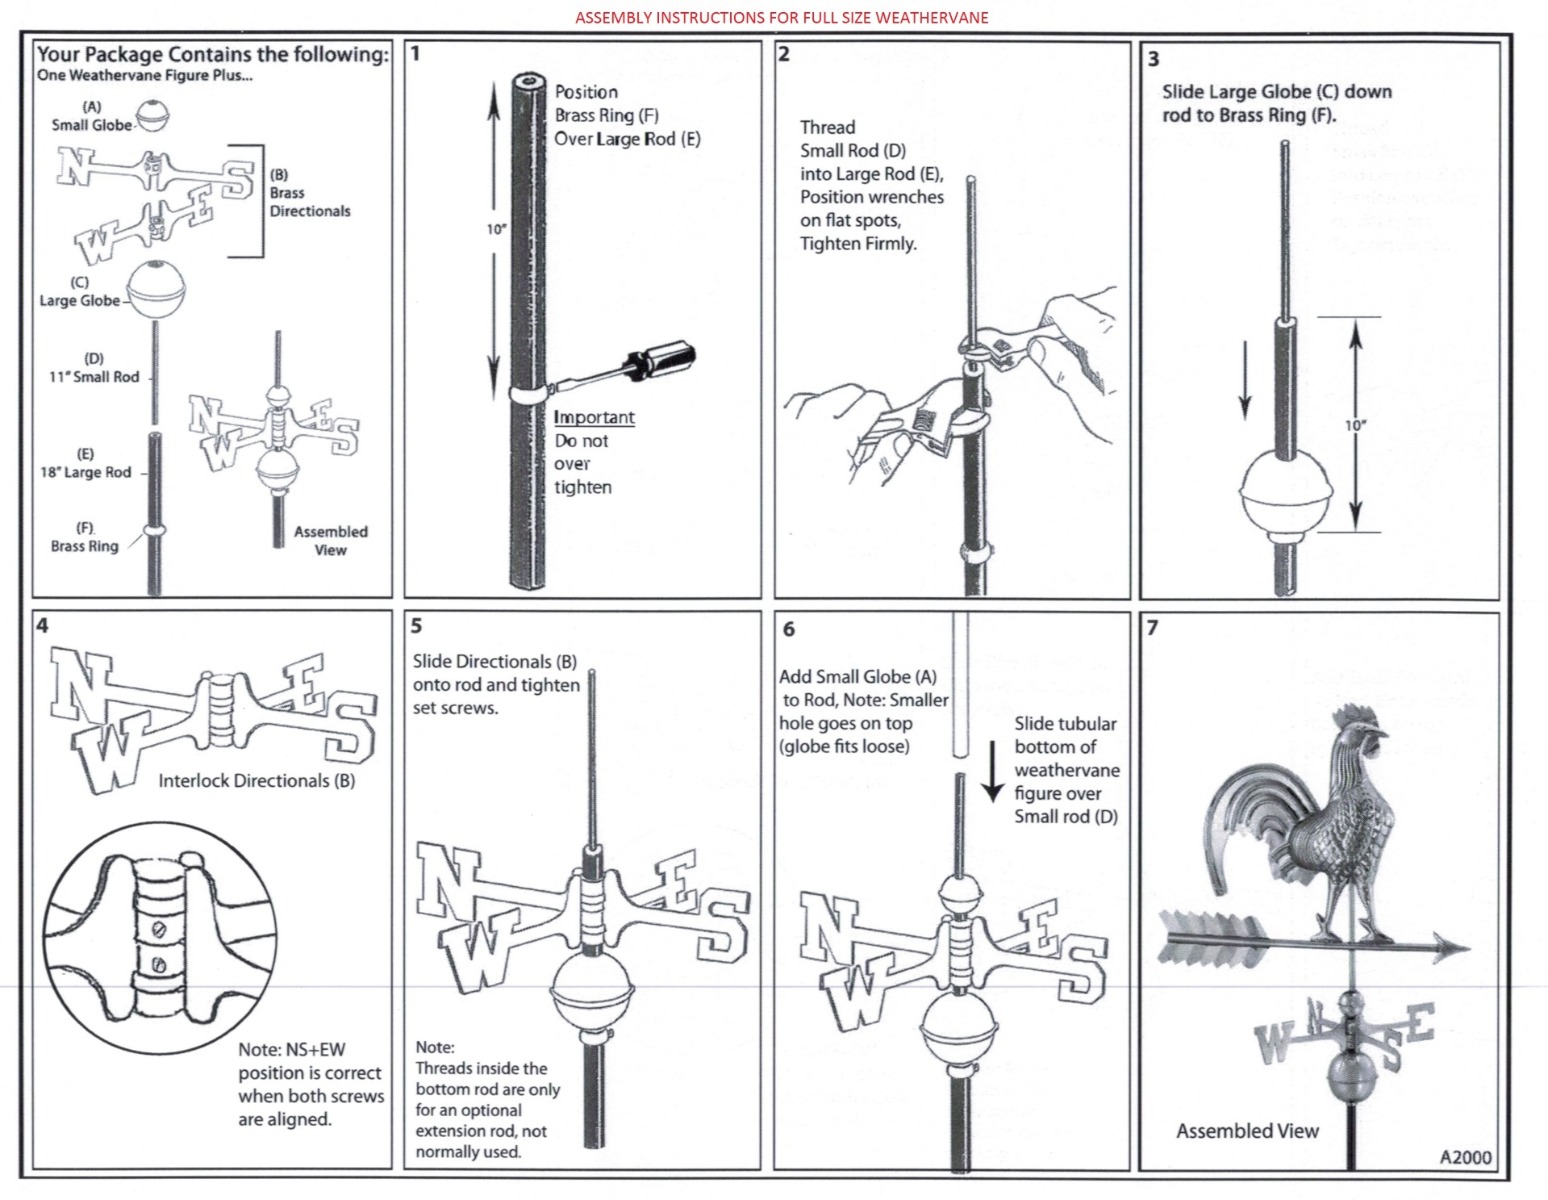
Assembly Instructions for Full Size Weathervane
Your Package Contains the following: One weathervane figure plus...
- (A) Small Globe
- (B) Brass Directionals
- (C) Large Globe
- (D) 11" Small Rod
- (E) 18" Large Rod
- (F) Brass Ring
- 1. Position brass ring (F) over large rod (E). Important - Do not over tighten.
- 2. Thread small rod (D) into large rod (E) & position wrenches on flat spots. Tighten firmly.
- 3. Slide large globe (C) down rod (D) to brass ring (F).
- 4. Interlock directionals (B). Note: NS + EW position is correct when both screws are aligned.
- 5. Slide directionals (B) onto rod and tighten set screws. Note: Threads inside the bottom rod are only for an optional extension rod, not normally used.
- 6. Add small globe (A) to rod. Note: Smaller hole goes to top (Globe fits loose). Slide tubular botom of weathervane figure over small rod (D).
This special recipe will add a lovely patina finish to your new polished copper cupola roof or weathervane (think Statue of Liberty!)
In a 1-quart spray bottle, mix the following ingredients:
½ quart water
½ quart white vinegar
4 tablespoons salt
Lightly mist the mixture onto the entire roof or weathervane surface so as not to allow running. Let AIR dry. Do not use a fan or let dry in windy conditions. Repeat application until desired patina effect is reached.
This “secret” organic solution will give you an easy way to gracefully age any polished copper surface! You can do in minutes what takes nature years to accomplish!